August
14th
2015

Extend the functions of UnityEngine.UI.Button
by

The new Unity UI elements offers a nice and easy to use items to build graphical interfaces. But, wanted to use buttons in one of our game leads us with a problem. As matter of fact, the standard Button offers only to trigger callbacks on onClick event, meaning user have to click down and release the click on the button. Using buttons to control directions and jumps, for directions, testing player felt a lack of reactivity, action triggered when the user released the button, so a moment after he pushed the button to turn. Also, we wanted to keep the player jumping while pressing the jump button.


Screen Shot 2015-08-14 at 01.52.08


Well, it is possible to hard code the action triggered by implementing in a script attached to the button IPointerUpHandler and IPointerDownHandler but that means less re-usability of your script and not really easy to debug/use on programmer’s side. And the solution is simple and elegant, so why not taking few minutes to implement it? Well, having a look into the default implementation here, it is simple as creating a script with the following code and attaching it to your button:


using System.Collections;
using System;
using UnityEngine.Events;
using UnityEngine.EventSystems;
using UnityEngine.Serialization;
using UnityEngine;

namespace Takohi
{
	public class EventUpDown : MonoBehaviour, IPointerDownHandler, IPointerUpHandler
	{
	#region PointerDown
		[Serializable]
		public class ClickDownEvent : UnityEvent
		{
		}

		// Event delegates triggered on down.
		[FormerlySerializedAs("onDown")]
		[SerializeField]
		private ClickDownEvent
			m_OnDown = new ClickDownEvent ();

		public ClickDownEvent onDown {
			get { return m_OnDown; }
			set { m_OnDown = value; }
		}

		// Trigger all registered callbacks.
		public virtual void OnPointerDown (PointerEventData eventData)
		{
			m_OnDown.Invoke ();
		}
	#endregion

	#region PointerUp
		[Serializable]
		public class ClickUpEvent : UnityEvent
		{
		}

		// Event delegates triggered on down.
		[FormerlySerializedAs("onUp")]
		[SerializeField]
		private ClickUpEvent
			m_OnUp = new ClickUpEvent ();

		public ClickUpEvent onUp {
			get { return m_OnUp; }
			set { m_OnUp = value; }
		}

		public virtual void OnPointerUp (PointerEventData eventData)
		{
			m_OnUp.Invoke ();
		}
	#endregion
	}
}

Now, you’re getting these new options in your editor:
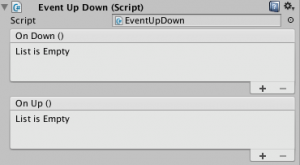
Screen Shot 2015-08-14 at 01.57.51

And if you want to remove the first line mentioning the script, you can just add your own editor script by creating a new script in Assets/Editor with the following code:


using UnityEngine;
using System.Collections;
using UnityEditor;

namespace Takohi
{
	[CustomEditor(typeof(EventUpDown), true)]
	public class EventUpDownEditor : Editor
	{
		SerializedProperty m_DownEventProperty;
		SerializedProperty m_UpEventProperty;

		protected void OnEnable ()
		{
			m_DownEventProperty = serializedObject.FindProperty ("m_OnDown");
			m_UpEventProperty = serializedObject.FindProperty ("m_OnUp");
		}

		public override void OnInspectorGUI ()
		{
			serializedObject.Update ();
			EditorGUILayout.PropertyField (m_DownEventProperty);
			EditorGUILayout.PropertyField (m_UpEventProperty);
			serializedObject.ApplyModifiedProperties ();
		}

	}
}

That’s it!

July
5th
2014

Flip Normals of a Mesh in Unity
by

 In Unity, there are a number of primitive object types that can be created directly such as sphere or cube. With these primitive objects, they are made to be visible only from outide the mesh, but what if, for example, you want to make a sphere or a cube visible from inside?

Here is a script to attach to your mesh in order to flip the normals and make it visible from inside:

using System.Linq;
using UnityEngine;
[ExecuteInEditMode]
public class FlipNormals : MonoBehaviour
{
	void Start()
	{
		var mesh = (transform.GetComponent("MeshFilter") as MeshFilter).mesh;
		mesh.uv = mesh.uv.Select(o => new Vector2(1 - o.x, o.y)).ToArray();
		mesh.triangles = mesh.triangles.Reverse().ToArray();
		mesh.normals = mesh.normals.Select(o -> -o).ToArray();
	}
}

In the screenshot below, the left sphere is the original primitive object: mesh is only visible from the outside. However, on the right sphere, the FlipNormals script is attached: the exterior part of the mesh became invisible. We can only see now the interior part of the sphere.

Left: Original Normals - Right: Flipped Normals

Left: Original Normals – Right: Flipped Normals

February
25th
2014

Use Simple IK on Unity
by

In this article, we will show you step by step how to add some inverse kinematics to your character thanks to our asset Simple IK available on the Unity Asset Store.

First of all, if you don’t know the meaning of inverse kinematics, here is the definition:

Inverse kinematics simplifies the process of animating jointed / segmented figures by making the motion of each part related to the motion of the linked parts. That way you simply have to animate the starting and ending joins, and the ones in between will adjust themselves according to the physics programming and create more natural looking movement. In forward kinematics, each piece would have to be animated separately.

Source: http://animation.about.com/od/glossaryofterms/g/def_inversekine.htm

Introduction

Simple IK is a very handy script that allows you to add inverse kinematics to  some bones and joints. After downloading the Simple IK asset, the script is available inside the folder Takohi with the name SimpleIKSolver.cs.

howto_simpleik_script

The aim of this article is to add inverse kinematics to an arm of  a rigged humanoid model. The model we use can be downloaded for free here.
Our goal is to make the avatar touching a sphere with his right hand by always keeping a realistic human posture.

Preparing the scene

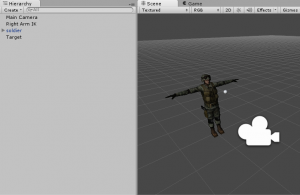
First, import the avatar into the scene, then create a empty game object you call ‘Right Arm IK’. This game object can be located anywhere and will be used to hold the script.

Now we need to make a target. A target (any game object) will represent the location the inverse kinematics system will to try to reach. As we said before, we want our avatar to touch with his right arm a sphere, so add a new sphere into the scene and name it ‘Target’. Resize it to have approximately the size of a tennis ball and put it front of our character.

tutorial_simleik_base

Configuring the IK

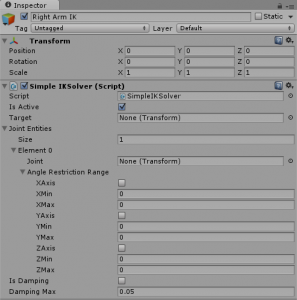
Now we will add the inverse kinematics to the right arm of the avatar. From the Takohi folder, drag’n drop the SimpleIKSolver.cs script on the ‘Right Arm IK’ game object.

tutorial_simpleik_script

Here is a description of all parameters:

  • Is Active: enable IK solver
  • Target: transform object to reach
  • Join Entities: list of all joins composing the IK
  • Join Entity:
    • Joint: transform object of the joint
    • Angle Restriction Range:
      • X Axis, Y Axis, Z Axis: enable angle restriction on x/y/z axis
      • X Min, Y Min, Z Min: minimum angle for x/y/z axis (from -180°)
      • X Max, Y Max, Z Max: maximum angle for x/y/z axis (up to 180°)
  • Is Damping: enable damping
  • Damping Max: damping value

For the target, just drag and drop the sphere we called ‘Target’ into the Target property.

Next, we will assign all the joints composing the IK. If you look at the structure of the avatar by dropping down the list, you should find that the right arm has three joints: arm, forearm, and the hand.

tutorial_simpleik_joints

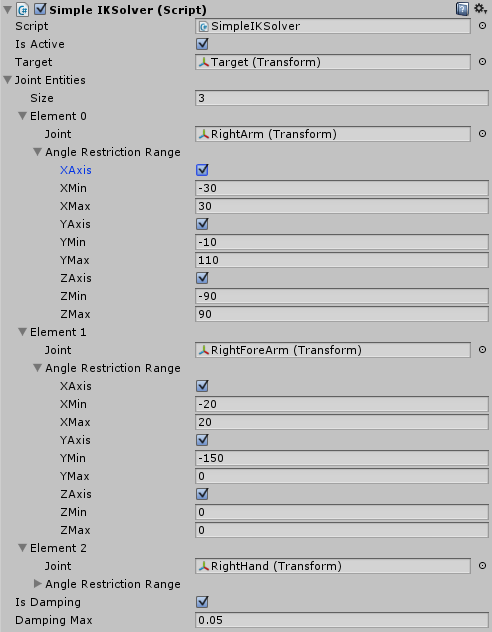
In the inspector of ‘Right Arm IK’ game object, set the size of the Join Entities array to 3 and add consecutively these joints. Then enable damping and set a value to 0.05 in order to smooth the movement.

tutorial_simpleik_inspector

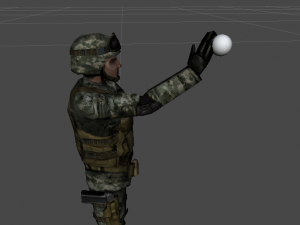
Everything is ready! Now play the scene and you should see the character trying to reach the target with his right hand.

tutorial_simpleik_result

Angles Restrictions

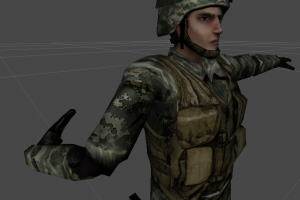
As the picture below, according to the position of the sphere, the arm of the character will have an unrealistic posture that is not possible for a human. We would like to avoid this situation and make our avatar more realistic.

tutorial_simpleik_wrong_result

To avoid this kind of unrealistic movement, we will add angles restrictions: the same angles restrictions as a human arm. If you look at the arm below with the axis, you can try by yourself to know with your own arm  and for each axis what is the angles restrictions imposed by your body.

tutorial_simpleik_arm_rotation_axis

After measuring with my own arm the angles limits for each axis and each joint, these are the values I set as angles restrictions to have a realistic movement of the arm:

tutorial_simpleik_angle_restriction

By example for the right forearm joint, it can only rotate now from -20° to 20° around the x-axis, from -150° to 0° to the y-axis, and no rotation allowed on the z-axis.

Now play again the scene and move the sphere to different positions. The arm of your avatar will always keep a realistic posture.

Conclusion

Now you have your character that can move his right arm to reach any object on the scene. Of course, inverse kinematics are not only useful for moving arms and legs but can be used in many cases (crane, snake, …) and so our asset Simple IK. Just use your imagination!

If you have any question, please ask us here on the dedicated thread on the Unity forum. We will reply to you as quick as possible.

February
3rd
2014

Forward/Redirect all one port requests to another port on Linux
by

This simple command allows you to forward all requests from PORT_SRC to PORT_DST:

iptables -t nat -A PREROUTING -i eth0 -p tcp --dport PORT_SRC -j REDIRECT --to-port PORT_DST

By default, Tomcat runs on port number 8080. One solution is to edit server.xml in order to change the listening port to 80. Otherwise, you can just redirect all port 80 requests to Tomcat’s port 8080 with this command:

iptables -t nat -A PREROUTING -i eth0 -p tcp --dport 80 -j REDIRECT --to-port 8080
January
3rd
2014

Virtual Keyboard with Unity
by

What happens if your application is targeting a touchscreen computer without a physical keyboard but requires keyboard input from the user? One solution, like in many games, is to create a custom virtual keyboard inside the application. But what if you want regional and language support like japanese, chinese, arabic…?
Based from the article from Intel “Touch keyboard access for Windows 8 desktop apps“, the following script will allow you how to call the built-in keyboards provided with the Windows OS.

However, in order to work, the application needs to run in window mode. Please follow this post in order to launch a maximized borderless Unity application for raising the virtual keyboard without disturbing the game.

using UnityEngine;
using System;
using System.Collections;
using System.Diagnostics;
using System.Runtime.InteropServices;

public static class VirtualKeyboard {
	[DllImport("user32")]
	static extern IntPtr FindWindow(String sClassName, String sAppName);
	[DllImport("user32")]
	static extern bool PostMessage(IntPtr hWnd, uint Msg, int wParam, int lParam);

	private static Process _onScreenKeyboardProcess = null;

	/// <summary>
	/// Show the touch keyboard (tabtip.exe).
	/// </summary>
	public static void ShowTouchKeyboard() {
		//ExternalCall("C:\\Program Files\\Common Files\\Microsoft Shared\\ink\\tabtip.exe", null, false);

		ExternalCall("TABTIP", null, false);
	}

	/// <summary>
	/// Hide the touch keyboard (tabtip.exe).
	/// </summary>
	public static void HideTouchKeyboard() {
		uint WM_SYSCOMMAND = 274;
		int SC_CLOSE   = 61536;
		IntPtr ptr = FindWindow("IPTip_Main_Window", null);
		PostMessage(ptr , WM_SYSCOMMAND, SC_CLOSE, 0);
	}

	/// <summary>
	/// Show the on screen keyboard (osk.exe).
	/// </summary>
	public static void ShowOnScreenKeyboard() {
		//ExternalCall("C:\\Windows\\system32\\osk.exe", null, false);

		if(_onScreenKeyboardProcess == null || _onScreenKeyboardProcess.HasExited)
			_onScreenKeyboardProcess = ExternalCall("OSK", null, false);
	}

	/// <summary>
	/// Hide the on screen keyboard (osk.exe).
	/// </summary>
	public static void HideOnScreenKeyboard() {
		if(_onScreenKeyboardProcess != null && !_onScreenKeyboardProcess.HasExited)
			_onScreenKeyboardProcess.Kill();
	}

	/// <summary>
	/// Set size and location of the OSK.exe keyboard, via registry changes.  Messy, but only known method.
	/// </summary>
	/// <param name='rect'>
	/// Rect.
	/// </param>
	public static void RepositionOnScreenKeyboard(Rect rect)
	{
		ExternalCall("REG", @"ADD HKCU\Software\Microsoft\Osk /v WindowLeft /t REG_DWORD /d " + (int) rect.x + " /f", true);
		ExternalCall("REG", @"ADD HKCU\Software\Microsoft\Osk /v WindowTop /t REG_DWORD /d " + (int) rect.y + " /f", true);
		ExternalCall("REG", @"ADD HKCU\Software\Microsoft\Osk /v WindowWidth /t REG_DWORD /d " + (int) rect.width + " /f", true);
		ExternalCall("REG", @"ADD HKCU\Software\Microsoft\Osk /v WindowHeight /t REG_DWORD /d " + (int) rect.height + " /f", true);
	}

	private static Process ExternalCall(string filename, string arguments, bool hideWindow) {
		ProcessStartInfo startInfo = new ProcessStartInfo();
		startInfo.FileName = filename;
		startInfo.Arguments = arguments;

		// if just command, we don't want to see the console displayed
		if(hideWindow) {
			startInfo.RedirectStandardOutput = true;
	        startInfo.RedirectStandardError = true;
	        startInfo.UseShellExecute = false;
	        startInfo.CreateNoWindow = true;
		}

		Process process = new Process();
		process.StartInfo = startInfo;
		process.Start();

		return process;
	}
}
December
13th
2013

Javascript callback on row click event with Primefaces datatable
by

Today with Primefaces, there is no way to call a Javascript function when an user select a row on a datatable.
The only solution I found is to use the ajax event:

<p:ajax event="rowSelect" oncomplete="doSomething();" />

But sometimes like me, what you want is only execute some codes on the client side, not on the server side by sending a new request. Unfortunately, no event attributes for client side have been implemented yet for the datatable component of Primefaces (at least, the version 3.5). So here is a workaround I found in order to execute some Javascript codes when the user has selected a row:

<p:dataTable var="row" value="#{myBeans.rows}" rowKey="#{row.id}" selectionMode="single" widgetVar="myTable">
	<p:column headerText="...">...</p:column>
</p:dataTable>


var f = myTable.onRowClick; // initial callback
myTable.onRowClick = function(event, rowElement) {
	// Call initial callback (we have to use apply because the method is using 'this'.
	f.apply(myTable, [event, rowElement]);
	var selectedRows = myTable.selection; // Array of selected row keys
	doSomething(selection); // Your callback
};
November
2nd
2013

Maximized borderless Unity application
by

Sometimes it can be necessary to start your Unity application as a maximized borderless window: one advantage is that it will allow you to start other applications above your game.

One situation is, by example, you want to allow the user of a touchscreen computer to write any text inside your game by launching a virtual keyboard app. In this case, using a borderless full-screen window is that raising the keyboard window does not disturb then game but will still continue running in the background to process keyboard input, and will regain focus automatically as soon as the keyboard is dismissed (see this link).

The following script, by being attached to a game object, will allow you to make your application borderless. Moreover, you can also set it to be fullscreen/maximized or at a defined size.

This script only works for a standalone windows application.

using System;
using System.Collections;
using System.Runtime.InteropServices;
using System.Diagnostics;
using UnityEngine;

/// <summary>
/// Allow a standalone windows application to run without border at a specific screen position or in fullscreen.
/// You can also use the command argument -popupwindow in order to do the same thing with less control.
/// This allows you to run other program over your unity application (as by example a virtual keyboard).
/// </summary>
[ExecuteInEditMode]
public class BorderlessMode : MonoBehaviour
{
	public Rect ScreenPosition;
	public bool IsFullscreen = false;

#if UNITY_STANDALONE_WIN && !UNITY_EDITOR
	[DllImport("user32.dll")]
	static extern IntPtr SetWindowLong (IntPtr hwnd, int  _nIndex, int  dwNewLong);

	[DllImport("user32.dll")]
	static extern bool SetWindowPos (IntPtr hWnd, int hWndInsertAfter, int X, int Y, int cx, int cy, uint uFlags);

	[DllImport("user32.dll")]
	static extern IntPtr GetForegroundWindow ();

	const uint SWP_SHOWWINDOW = 0x0040;
	const int GWL_STYLE = -16;
	const int WS_BORDER = 1;

	void Start ()
	{
		if(IsFullscreen)
			ScreenPosition = GetFullscreenResolution();
		SetWindowLong (GetForegroundWindow (), GWL_STYLE, WS_BORDER);
		bool result = SetWindowPos (GetForegroundWindow (), 0, (int)ScreenPosition.x, (int)ScreenPosition.y, (int)ScreenPosition.width, (int)ScreenPosition.height, SWP_SHOWWINDOW);
	}
#endif

#if UNITY_EDITOR
	void Update() {
		if(IsFullscreen)
			ScreenPosition = GetFullscreenResolution();
	}
#endif

	Rect GetFullscreenResolution() {
		Resolution resolution = Screen.currentResolution;
		return new Rect(0f, 0f, (float) resolution.width, (float) resolution.height);
	}

}